| Size |
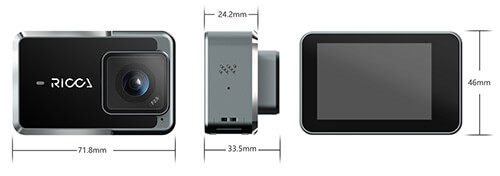
 Length*Width*Height:71.8mm*33.5mm*46mm Pure weight:137gram(include the battery) Material:Aluminum frame Surface treatment:Special anodic oxidation process |
||||||||||||||||||
| Lens | Lens F2.8 aperture / 155° wide-angle lens, 7G | ||||||||||||||||||
| Display | 2.35”, 320×480 resolution touch screen | ||||||||||||||||||
| Main Processor and Image Sensor | HiSilicon3559V100,SONY Image Sensor IMX377, 1/2.3”, 12 megapixels CMOS image sensor with Exmor R ability. | ||||||||||||||||||
| IP Rating | Waterproof:IP67, waterproof at depths of up to 1 meters in 30minutes, up to 40meters with waterproof case as optional accessory. | ||||||||||||||||||
| Camera setup |

|
||||||||||||||||||
| Video Mode |
Video Format:JPG(Photo),MP4 |
||||||||||||||||||
| Electronic Image Stabilization |
Built-in 3 axis gyroscope and 3 axis accelerometer. Uses a cross-border compensation algorithm to compensate the motion change to produce stable video quality. Resolutions supported:All the resolution. 100% of the wide-angle lens distortion correction |
||||||||||||||||||
| Audio | Double-Channel Microphone,built-in speaker | ||||||||||||||||||
| Photo mode |
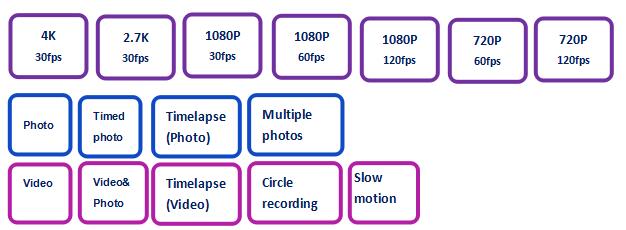
Timed photo(Count down, then take photo )
Timelapse Photo(Capture a series of photos at timed intervals.)
Multiple photo(Press the shutter button to capture a series of photos.)
|
||||||||||||||||||
| Port |
Micro USB 1.Charge 2.Connect with Computer Via USB cable to play back/ copy files /charge the battery |
||||||||||||||||||
| Battery and working hours |
Charging Ricca with 5V/1A charger is suggested . The indicator next to RICCA logo flashes red while charging. The indicator keeps green when the battery is fully charged. Battery capacity: 1400mAH Lithium-ion,It can be charged directly from USB port (DO NOT put in under the water while charging) Working hours: 2hours(External ambient temperature, humidity and recording content will affect the battery life), Charging hours: 2 hours. |
||||||||||||||||||
| Button operations |
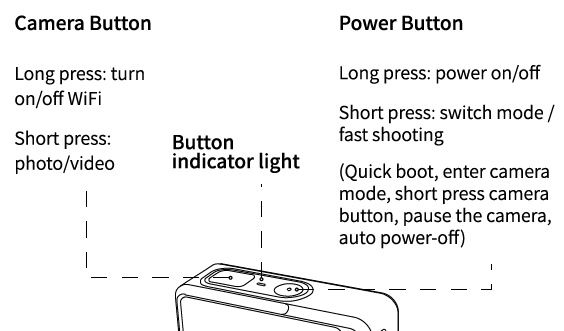
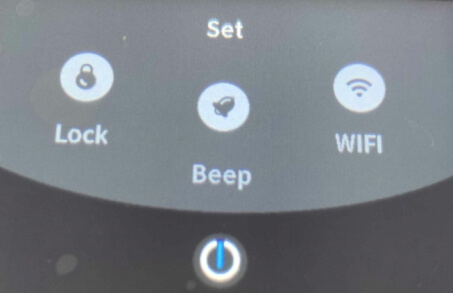
Power button operations 1 Long press:Power on/Power off. 2 Single tap when it is off:Enter quick shooting mode, it will turn off itself after finishing the recording. 3 Single tap when it is on:Switch camera modes between photo , multiple photo and video Camera button operations(red marked) 1 Single tap:Start/Stop recording 2 Long press:Turn on/off WiFi。  WiFi operations 1 Turn on/off WiFi: Swipe down to quick setting interface, tap the symbol of WIFI to turn on the WIFI, Tap again to turn off the WIFI. Or you can tap the symbol at right corner to system setting, swipe down to WIFI setting and then turn it on /off. 2 Connect App:Turn on WiFi, and run Ricca APP, connect WIFI according to the info. of Ricca WIFI. 3 Control Ricca with APP: After connecting Ricca with APP, you can control the Ricca from APP to start/stop the recording, switch camera mode, change resolution and parameter, play back and monitor the footage in real time.  Other settings can be done on touch screen ,please check more details in user manual. |
||||||||||||||||||
| Ricca App functions | Monitor the camera in real time, play back the video and photo, remote control the camera to start/stop the recording, switch camera mode, change resolution and parameter, show the battery level and remaining capacity of Micro SD card, switch between horizontal mode and vertical mode, edit the video online and share it on social media, reset the WIFI and upgrade the firmware. | ||||||||||||||||||
| Play back the video and photo |
Option 1:LCD Directly check the photos and play back the video on touch screen of Ricca. Option 2:App Ricca App monitor the footage of camera in real time, play back the video and photo. Option 3:Computer Connect via Micro USB to USB cable with Computer to check and play back the video and photo. Or copy files from MicroSD to computer. |
||||||||||||||||||
| Transmission and save the files | WIFI 2.4Ghz | ||||||||||||||||||
| Storage cards |
Storage standard: MicroSDHC, MicroSDXC 16GB - 64GB Storage card. Please use UHS-I Speed Class 3 (U3) storage card, it can provide High-speed and great performance. We recommend a MicroSD card below to ensure high-quality 4K video. |
||||||||||||||||||
| How to upgrade the firmware |
Option 1:Upgrade with MicroSD card ⑴Save the upgrade file at Root directory of MicroSD card on Computer, and then put MicroSD card in Ricca. ⑵Press the camera button and hold it, press the power button at the same time until the indicator next to Ricca logo turns green. ⑶The indicator flashes blue and green to give a hint that the upgrade is precessing. It takes about 2 minutes to finish the upgrade. ⑷The camera will auto-power on after the upgrade is done. Note for upgrade with SD card: * If the camera is latest version, it won’t re-upgrade if you did the upgrade operations, only turn it on. * If there is upgrade file in SD card, please do the upgrade step by step, If do wrong operation to just turn it on, the upgrade file will be deleted automatically and then upgrade is cancelled, you have to copy the file again in SD card. * SD card format is requested as FAT32(right click—property),Or you have to format SD card and then copy the upgrade files. Option 2: Upgrade on APP(NOT Available yet) |
||||||||||||||||||
| Other parameters |
Operate Temperature:0℃~40℃(14°F-104°F) Operate Humidity:15~90%RH Storage Temperature:-20℃~60℃(-4°F-140°F) Indicator:Red/Blue/Green Color:Grey Extended port:¼inch thread hole |
||||||||||||||||||
| Package list |
⑴Ricca camera *1pcs ⑵T type base*1pcs ⑶Fixing part*1pcs ⑷User manual and warranty card*1pcs ⑸Hand strap*1pcs ⑹Data cable*1pcs ⑺Lithium-ion *1pcs ⑻Curved fixing plate*1pcs ⑼Flat fixing plate*1pcs |
||||||||||||||||||
| Optional Accessory |
FeiyuTech G6 gimbal(Change the mounting plate for Ricca,upgrade the keypad firmware of G6 to control the Ricca) Controllable function:Turn on G6 to control Ricca power on at the same time,Control the Ricca to picture-taking and video-taking, set up parameter of Ricca. Bluetooth pairing for the first time:Turn G6 onTurn Ricca onWait for auto-connection. If auto-connection is not done in 1 minute, please reset the camera and then wait for auto-connection. Start-up control for Ricca(Bluetooth pair with G6 before): When turning G6 on, Ricca will power on at the same time , default mode is video mode and then start the recording, it takes about 10 seconds to get a auto-connection of Bluetooth between the G6 and Ricca, Now G6 can control the Ricca . If Bluetooth connection is not done in one minute, please reset the Ricca and wait for auto-connection. Change another G6: Please reset the Ricca , and turn this G6 off, turn another G6 on, camera will detect the one whose signal is strongest and do Bluetooth auto-connection. Special Note for WG2X:The operation on WG2X about Bluetooth pairing and controlling Ricca is the same as G6. Waterproof case(No photo for the time being) |
||||||||||||||||||
| Features |
1、Won the Red Dot Design Award 2、Exquisite metal body to get great cooling performance, special anodic oxidation process makes it remain fresh . 3、Dive deeper with Ricca that is IP 67 rating to explore sea world. 4、Camera solution from HiSilicon to give a real 4k video solution. 5、155° Super wide-angle,Lens F2.8 Aperture,100% of the distortion correction to make a real broader view. 6、6-Axis Electronic image stabilization based on neural network to stabilize every best moments. 7、Auto Low Light delivers optimal image quality in the dark scene. 8、7x digital zoom makes more wonderful details to be zoomed in&out. 9、Dynamic data rate adaptation enables high compression ratio to save more space. 10、Manually metering mode enables you to choose any position as metering center. 11、Dual Microphone input can get good noise reduction performance. 12、Working with FeiyuTech G6&WG2X, get more steady video and convenient operation. 13、Brand new APP Ricca to monitor and share the video/photo at any time. |